This tutorial shows you how to work with the Scan and Optimize features in Acrobat 9. See what the all-new Acrobat DC can do for you.
Download a free trial of the new Acrobat.
Optimize PDF files in Acrobat 9 with better results
Learn how to use the PDF Optimizer in Acrobat 8 and 9 to reduce file size.
By James Dempsey – July 17, 2009

Learn how to use the PDF Optimizer in Acrobat 8 and 9 to reduce file size.
Most people who work with PDFs in Acrobat versions older than version 8 know you can quickly reduce the file size of a PDF by going to the File menu and selecting Reduce File Size. The problem with using that method was that it virtually destroys your images, making them so blurry that you can barely see what they are.
Thankfully, with Acrobat 8 and 9, a new PDF optimization method is available. The PDF Optimizer can be found in two places. The first place is in the menu bar under Advanced>Print Production>PDF Optimizer. The second, and more handy location, is in the Save As dialog box, where you click the drop-down menu and select Adobe PDF Files, Optimized as seen below.
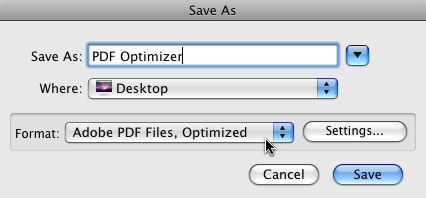
Clicking the Settings button offers you complete control over how your PDF files get optimized.
The first thing to do is figure out what's taking up so much space in the file. You do this by clicking the Audit space usage button in the upper right corner of the PDF Optimizer dialog box. A window will open offering you a breakdown of what's eating up all the space (see image below).
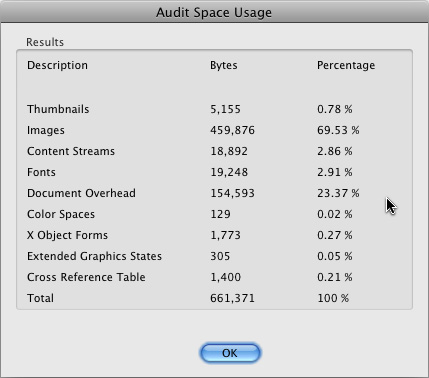
As you can see in the image above, the images in my test PDF file are what's taking up the most space, so that's where I need to focus my attention.
Close the Audit window to return to the PDF Optimize dialog box.
In the panel list on the left side of the PDF Optimizer, you can choose which areas of the PDF file you wish to work with. In the case of my test file, I chose Images. As you can see in the screenshot below, you can downsample your images, select the quality settings, and more.
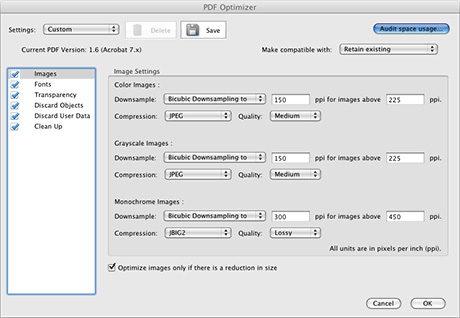
As opposed to older versions of Acrobat where the program just decided for you to reduce everything to the bare minimum, the new PDF Optimizer gives YOU the control and the choice.
Selecting other source items such as Transparency, Discard Objects, Fonts, and Clean Up are also available. I recommend you take a look at all of these to see where you might be able to save a few "k" in file size. It all adds up.
I also recommend you don't overwrite the original PDF file, just in case you're not happy with the results.
If you wish to see the PDF Optimizer in action, visit the Acrobat 9 PDF Optimizer page at CreativeTechs, where they have a brief video you can watch to learn more.
Reprinted with permission from James Dempsey at The Graphic Mac.
Products covered: |
Acrobat 9 |
Related topics: |
Compress PDF online, Scan and Optimize |
Top Searches: |
Compress PDF onlineCreate PDF convert scanned documents to PDFs get started with Acrobat DC |
Try Acrobat DC
Get started >
Learn how to
edit PDF.
Ask the Community
Post, discuss and be part of the Acrobat community.
Join now >
2 comments
Comments for this tutorial are now closed.
Latika
5, 2012-09-25 25, 2012hello
how to reduce pdf file size i have no idea please give me a software link tutorial.
Thanks, Latika
Hi Latika,
There are several good tutorials on how to reduce PDF file size. Depending on your version of Acrobat, you may want to check out these tutorials:
https://acrobatusers.com/tutorials/how-optimize-your-pdf-file
https://acrobatusers.com/tutorials/reducing-file-size
Patty
Sampath V. Raghavan
3, 2012-09-16 16, 2012I am using Acrobat Prof 8.3 . I would like to know how to:
1. Use different Fonts, Sizes, etc, when editing a PDF document ?
2. Where is the Erase Tool to use while editing existing/Converted to PDF documents ?
I would appreciate a ASAP answer sent to my EMail
Thanks. May Peace & Smile be with you
Hi,
To edit the text in a PDF, I would recommend this tutorial:
https://acrobatusers.com/tutorials/how-to-edit-text-in-a-pdf
There is not an erase tool but you can edit a PDF using a tool like Photoshop, which has an erase tool.
Lori
Comments for this tutorial are now closed.