This tutorial shows you how to work with the Combine Files features in Acrobat 9. See what the all-new Acrobat DC can do for you.
Download a free trial of the new Acrobat.
How to create a geospatial PDF using Acrobat 9
Learn how to create a geospatial PDF by either opening a geospatially enabled TIFF or JPEG 2000 file or by georegistering a PDF map or scan.
By Adobe – June 18, 2009

You can create a geospatial PDF in one of two ways:
- Open a geospatially enabled TIFF (GeoTIFF) or JPEG 2000 file
- Georegister a PDF map or scan of geospatial data
When you open an imported file, measurements, point position, and length are displayed in geographic coordinates, which you can change, measure, and mark up. You can also assemble a PDF map from a variety of sources.
Open GeoTIFF and JPEG 2000 files
GeoTIFF files and JPEG 2000 files are raster images that you can import as new documents or as new layers to an existing document. Acrobat preserves the geospatial coordinates embedded in the file. These files retain their geospatial data when they are imported. If you import these files to existing documents, their coordinate system is converted to the coordinate system of the document.
- Choose File > Create PDF > From File.
- Select the geospatially enabled file to import.
- Select settings, and then click OK.
Import shapefiles
You can import a shapefile as a new layer to an existing PDF. The shapefile must overlap with the current PDF map; otherwise, it is not imported. If it overlaps only partially, only the part that overlaps the current PDF is imported.
A shapefile consists of several files with differing file name extensions. Acrobat requires both the SHP file and the DBF file for importing.
- Open a PDF map, and choose View > Navigation Panels > Layers.
- Select Option on the Layer sidebar and click Import As Layer.
- Browse to the SHP file and select it.
- Click Settings and change the Line Properties to a solid line and the line color to blue.
Georegister a PDF map
Georegistration enables you to take any PDF map and add coordinates that map to real-world locations. To georegister a map, you need the boundary coordinates of the map (latitude and longitude). You also need the
projection scale on which the map is based. With this information, Acrobat can accurately transform the map to WGS 1984, the standard reference frame for earth.
- Choose Tools > Analysis > Geospatial Registration Tool

- Click one corner of the map, and in the Geospatial Registration dialog box, type the latitude and longitude coordinates for the first point.
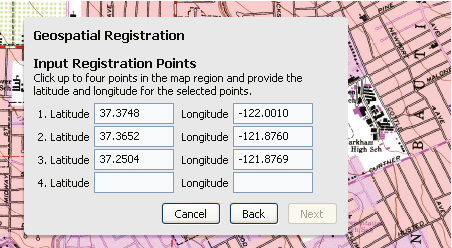
The coordinates define the area that is registered.
Products covered: |
Acrobat 9 |
Related topics: |
Combine Files |
Top Searches: |
Create PDF combine files into one PDF Rearrange PDF pages |
Try Acrobat DC
Get started >
Learn how to
edit PDF.
Ask the Community
Post, discuss and be part of the Acrobat community.
Join now >
3 comments
Comments for this tutorial are now closed.
Bill Gunby
9, 2013-02-01 01, 2013I have a map of a lake that is a pdf. I’d like to convert it to a geo_pdf so that my terra-go tool bar would show lat/long of various points on the lake. Would this method work to convert a pdf to a geo_pdf? Or is there another way to do this? If anyone knows how, I sure would appreciate an email on it. Thanks.
Hi Bill,
The ability to create and register new files in no longer part of Acrobat X or XI but you can still do this if you have Acrobat 9 Pro. Extended.
Thanks,
Lori
Dave Merchant
7, 2012-07-23 23, 2012There are several example files in our gallery : https://acrobatusers.com/gallery/geospatial
Although the creation of geospatial PDF files is now depreciated in the Acrobat X Family, you can still measure and annotate existing files. To create and register new files you must use third-party software.
Ammad Akram
9, 2012-07-19 19, 2012can any body give me a pdf file with geo coordinates visible as a annotation in the pdf file. I want to see how the marking of geo coordinates look like in the file.
Comments for this tutorial are now closed.