This tutorial shows you how to work with the Scan and Optimize features in Acrobat 9. See what the all-new Acrobat DC can do for you.
Download a free trial of the new Acrobat.
Optimizing your PDF Documents with Acrobat 9
Learn how to clean up your PDF documents using optimization methods available in Acrobat 9.


Cleaning up your PDF documents
There is much more to a PDF document than the obvious text and images. Other entities range from comments and attachments to layers and information from the document’s source program that you may not want or need to save. Acrobat 9 Professional offers several mechanisms for examining, optimizing and dealing with PDF document content.
Acrobat 9 offers four methods for optimizing files (Figure 1). Each method listed increases in complexity and time involved to complete the task from left to right on the continuum. However, the amount of control and customization increases from left to right as well.

Figure 1: Choose a file optimization method according to your needs.
Your choices include the following:
- The simplest method uses the File > Save As command. Acrobat discards auto-saved iterations of the document and cleans up the file to decrease the file size.
- Let Acrobat optimize the file with a single command using the Reduce File Size command. Choose Document > Reduce File Size to open the dialog box. Choose an Acrobat version compatibility from the dropdown list—the newer the version, the greater potential reduction in file size.
- To select general types of extraneous material—such as comments and hidden text—turn to the Examine Document command.
- For making a document the most efficient file size without sacrificing quality, use the PDF Optimizer.
Examining a PDF file
The Examine Document feature is essentially a subset of the PDF Optimizer and contains the most prevalent and commonly removed file elements.
Open the file you want to evaluate and follow these steps:
1. Choose Document > Examine Document. Acrobat processes the active document and opens the Examine Document panel, listing items found and options to show details (Figure 2).
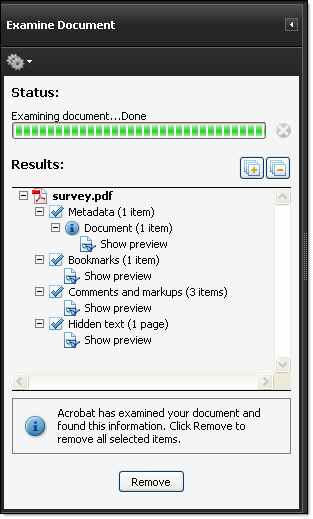
Figure 2: Select existing content to remove from the file.
Tip: An Alert dialog box displays if there are attached PDF files explaining that the process applies only to the current file, and that you have to open the attachments and run the process separately for examining the attachments.
2. Check through the features identified. Table 1 lists the types of content examined, such as reviewing hidden text, or text overlaid by other text or in white on various pages of the file (Figure 3).
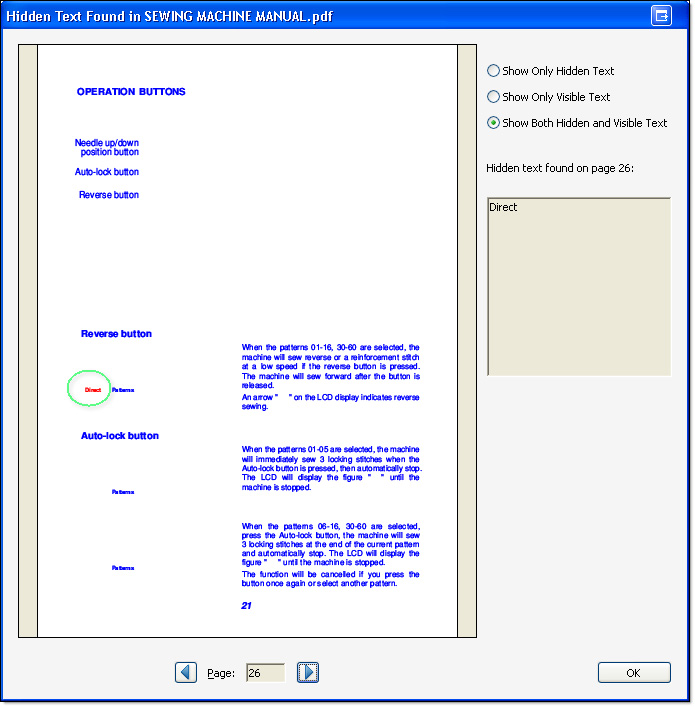
Figure 3: Review hidden and visible text in the preview dialog box.
3. Clear checkmarks for any features you want to preserve and click Remove to display the Examine Document information dialog box. As noted in the dialog box, other program items are automatically removed when you delete content, including digital signatures, Reader-enabled rights, review and forms workflows and information added by third-party applications. Click OK to close the information dialog box and process the file.
4. The Examine Document panel lists the changes made. Save the file to preserve the modifications.
Tip: Once saved, you can’t revert to the unprocessed document state. Save the file with another name if you may need the original content in the future.
Table 1: Types of information that can be removed
Content type | Type of content | Where to view in Acrobat |
| Metadata | Information about the document used for searching and managing files, such as content, keywords, subject and author’s name | Choose File > Properties |
| File attachments | Files attached to the file before generating the PDF file from the source program, or those attached within Acrobat | Choose View > Navigation Panels > Attachments |
| Annotations and comments | All comments added to the document using the Comments & Markup tools, any files attached as comments | Choose View > Navigation Panels > Comments |
| Form field logic or actions | Form fields—including signature fields—are flattened, actions and calculations are removed | Choose Forms > Add or Edit Fields or View > Navigation Panels > Signatures |
| Hidden text | Text in the PDF document that is covered by an image or other text, is transparent, or uses the same color as the background | Click Show Preview on the Examine PDF panel |
| Hidden layers | The layers in a document can be specified as hidden or shown; hidden layers are deleted and remaining layers are flattened into a single layer | Choose View > Navigation Panels > Layers |
| Bookmarks | A panel listing of text items used for linking to specific locations and magnifications in the document | Choose View > Navigation Panels > Bookmarks |
| Embedded search index | A text index embedded into a file to speed up search processes | Choose Advanced > Document Processing > Manage Embedded Index |
| Hidden page and image content | Content removed from a document such as text or images or cropped page segments are included as file elements | — |
Optimizing PDF documents
The Examine Document process gives you control over content removal, but doesn’t let you examine a document that contains multimedia or one containing significant edits. For example, if you’ve added, removed or changed multiple renditions of multimedia content, Acrobat stores extraneous information about the renditions and changes. While you may need that information during your project development, you don’t need it in the finished file.
Choose Advanced > PDF Optimizer to open the dialog box. The first step is to analyze the document to see its contents. Click Audit Space Usage to examine the document and generate a report (Figure 4).
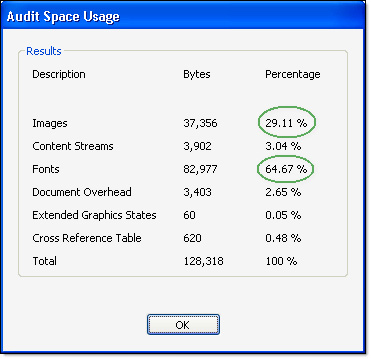
Figure 4: Review the document’s components before optimizing.
The report lists the percentages of the entire document size and size in bytes for elements such as comments, form fields and images. In the example, the fonts use nearly 65 percent and images nearly 30 percent. Click OK to close the audit report.
Configuring options
The default settings for optimization in the PDF Optimizer are the same as those of the document. If you click the Make compatible with pull-down arrow and choose another program version, the Settings name in the upper left of the dialog box changes from Standard to Custom, as shown in Figure 5.
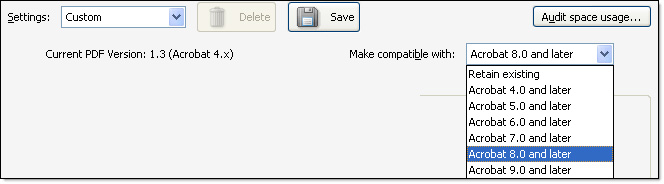
Figure 5: Review the document’s components before optimizing it.
The column at the left of the PDF Organizer lists the optimization categories, shown in Figure 6. Click a category label to display settings at the right of the dialog box. The optimizing options vary according to the program version selected in the Make compatible with list.

Figure 6: Customize settings to balance document quality against file size.
Here are some common types of optimizing to consider:
- Specify settings for images in your document, including color, grayscale and monochrome images. You can define compression types, quality and downsampling values, terrific for saving a copy of the file for quick webpage downloading.
- The dialog box lists all fonts used in the document. Unembed fonts you don’t need embedded, such as common and system fonts.
- By default, the Transparency settings aren’t active in the PDF Optimizer. Depending on your document contents, choose transparency flattening and settings, such as resolutions for text, line art and gradients.
- Select objects to remove in the Discard Objects settings. You can select objects such as form fields, alternate images and search indexes.
- Decide which user data objects to remove, such as layers, form content, cross-references and comments on the Discard User Data pane.
Note: The Discard Objects and Discard User Data panes list the objects evaluated by the Examine Document process.
- Choose commands from the Clean Up Settings pane to take care of other cleanup details, such as removing invalid links or bookmarks, encoding options and a method of compressing the document’s structure.
When you’ve finished choosing optimization settings, click Save to close the dialog box. Name and save the optimized file.
Reusing optimizations
You don’t have to configure PDF Optimizer settings each time you optimize a particular type of file. Once you’ve chosen settings, click Save on the PDF Optimizer dialog box to name and save the settings. The next time you prepare the same sort of file for distribution, choose Advanced > PDF Optimizer to open the dialog box, click the Preset pull-down arrow and choose your custom settings. Click OK to process the file.
Products covered: |
Acrobat 9 |
Related topics: |
Scan and Optimize |
Top Searches: |
Create PDF convert scanned documents to PDFs get started with Acrobat DC |
Try Acrobat DC
Get started >
Learn how to
edit PDF.
Ask the Community
Post, discuss and be part of the Acrobat community.
Join now >
1 comment
Comments for this tutorial are now closed.
Lori Kassuba
6, 2014-07-25 25, 2014Hi DeeDee Martin,
You’re going to want to make sure you subset embed all your fonts in your form to avoid display issues. However, you might want to try using the “List text using non-embedded fonts” Preflight Profile to find what has not been embedded correctly in your file.
Thanks,
Lori
DeeDee Martin
4, 2014-07-24 24, 2014I’m trying to optimize my pdf forms. When I go into PDF Optimizer and select Fonts, none of the fonts used in the file are listed. When I go into File Properties, there are 6 fonts listed, some of which are embedded. I would love to unembed the fonts, but since they are not listed in Optimizer, I am not able to. What can I do?
Comments for this tutorial are now closed.