The Acrobat JavaScript Console (Your best friend for developing Acrobat JavaScript)
Learn how to code Acrobat JavaScript, including testing and debugging code with the Acrobat JavaScript Console window.
By Thom Parker – October 28, 2013


The Acrobat JavaScript Console Window (a.k.a. the Console Window) is one of the many tools included in the Acrobat JavaScript Debugger Dialog (Figure 3). The Console Window is the best of the bunch. The other tools are very useful and have much better performance and stability in Acrobat XI than in previous versions. However, the Console Window remains many times faster and easier to use than the other tools, as well as being error free.
The Console Window is a multi-purpose and somewhat generic tool. It is the default location where JavaScript error messages are displayed as well as being an entry window for testing and debugging Acrobat JavaScript code. It can also be used to execute code snippets to automate tasks in Acrobat and to analyze documents. It does not do everything needed to debug code, but it does provide a quick and easy way to perform most of the code development tasks you'll ever need to do. In this article, we'll cover setting up and using this essential tool.
Note: Special instructions for using the Console Window with Reader are provided at the end of the article.
Setting up the Console Window in Acrobat XI
If this is your first time using the Console Window, you will need to enable and configure it from Acrobat's Preferences settings. Depending on your platform, use one of the following methods to open the Preferences dialog (Figure 1).
| Acrobat Preferences | ||
| Platform | Shortcut | Acrobat Menu Item (Acrobat 6.0 and above) |
| Windows | Ctrl + K | Edit > Preferences |
| Macintosh | Command + K | Acrobat > Preferences (On Application menu) |
In Preferences, select the JavaScript panel. Make sure both Enable Acrobat JavaScript and Enable interactive console are checked. These are the two most important preference settings. In fact, both of these settings may already be checked. JavaScript is turned on by default, and Acrobat will automatically ask you if you want to turn on the Console Window if you attempt to use it.
It is not a good idea to check Enable JavaScript debugger after Acrobat is restarted, except in two situations. First, you can enable it temporarily in order to change the "Exception" options. I prefer the options as they are shown in Figure 1, but uncheck this option before exiting the preferences. The reason for not enabling the debugger is because it has a significant negative impact on Acrobat performance, and can even cause Acrobat to crash. So the only reason you would actually turn on the debugger is if you needed to use the debugging tools. If you don't already know how to use software debugging tools, you are much better off sticking to the Console Window.
A very useful feature is the external JavaScript editor, since the default Acrobat editor is very basic. A good JavaScript editor will have advanced features that make code manipulation and navigation easier when you are editing document code. You won't be using the JavaScript editor with the Console Window, but this group of settings has an interesting effect on it. The Acrobat editor font and size settings are the same settings used in the Console Window. You can see in Figure 1 that I have chosen to use an external editor. This selection disables the Acrobat editor and grays out the font and size settings. However, these are still the settings used by the Console Window. If you want to change them you'll need to temporarily enable the Acrobat editor to modify the settings, then reselect the external editor. In order for the settings to take affect you'll need to close and reopen the Console Window.
After these preferences have been set (Figure 1), you're ready to start using the Console Window.
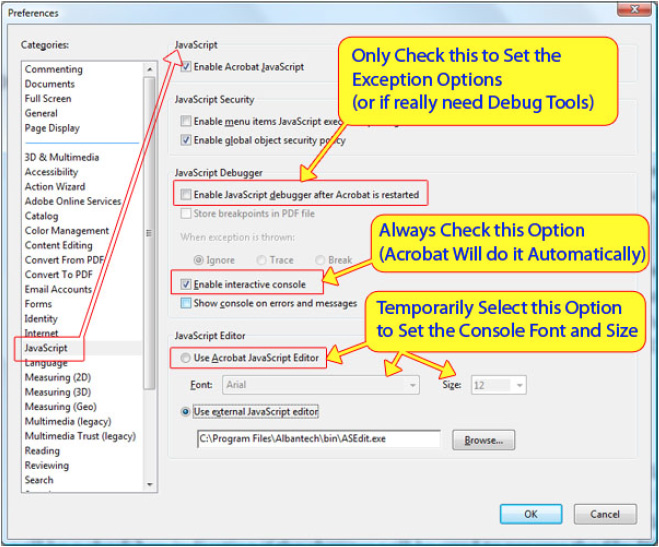
Figure 1 — Acrobat XI Preferences for Enabling the JavaScript Console
Activating the Console Window in Acrobat
In Acrobat X and XI, there are two methods for displaying the JavaScript Debugger, which is where the Console Window lives - the tool bar button (Figure 2) and the shortcut key.
| Activating the Console Window - Acrobat X and XI | ||
| Platform | Shortcut | Tools > JavaScript Panel |
| Windows | Ctrl + J | JavaScript Debugger Button |
| Macintosh | Command + J | JavaScript Debugger Button |
The shortcut key can be a bit tricky on the Macintosh because there are slight differences between the keyboards on laptop and desktop systems. So the keyboard shortcut is not always valid, but the tool button will always work.
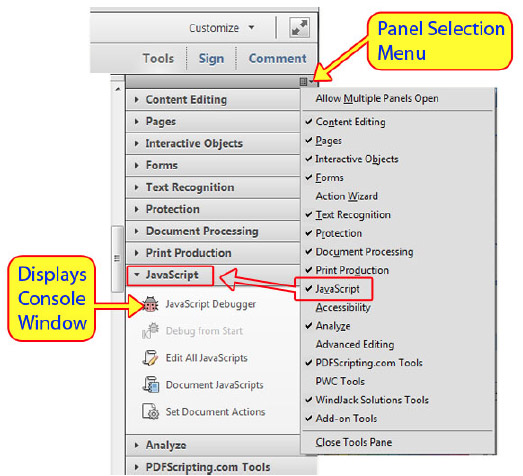
Figure 2 — Displaying the Console Window in Acrobat X and XI
The tool panels are a new feature introduced in Acrobat X, so displaying the Console in earlier versions is slightly different. The Shortcut key is the same, but instead of a tool button, these earlier versions use a menu item.
| Activating the Console Window - Acrobat 6 to Acrobat 9 | ||
| Platform | Shortcut | Tools > JavaScript Panel |
| Windows | Ctrl + J | Advanced > JavaScript > Debugger |
| Macintosh | Command + J | Advanced > JavaScript > Debugger |
The activated Debugger dialog window is shown in Figure 3 below.
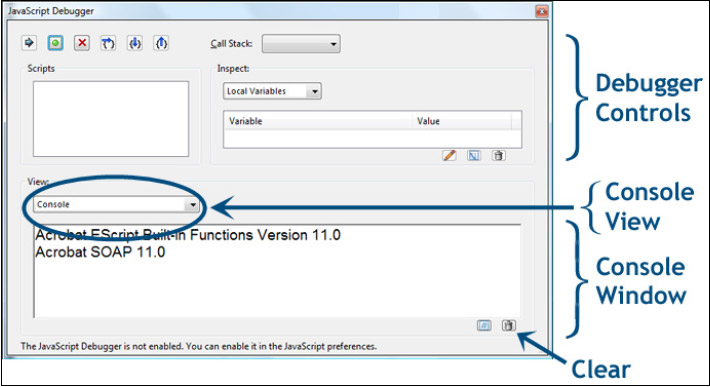
Figure 3 — Acrobat XI JavaScript Debugger, Console Window selected
The Console Window section of the Debugger is in the bottom portion of the dialog, in the area labeled View. In Figure 3, the View pull-down selection list is set to Console, meaning the Console Window is being shown. This area is also used to show the Script window (for displaying runtime code when the debugger tools are enabled). In the figure, the Console is being shown immediately after Acrobat was started. The status messages are displayed by code built-into Acrobat and loaded on startup. Each line represents a JavaScript module loaded by Acrobat. If there were any problems with these modules, or any others that Acrobat loads, error messages would also be displayed here.
Normally, we're not interested in these initial messages. So if you would like to try out some of the code presented here as examples, then clear the window by pressing the button that looks like a garbage can in the lower right corner of the window. Now we have a clean work area and are set up and ready to start using the Console Window.
Using the Console to run code
JavaScript code can be executed directly from the Console Window. This ability is a huge time saver since it provides a fast and easy way to test out code before it's placed into a scripting location where it will be more difficult to debug.
Let's try out some simple examples. Enter the following line of code into the Console Window.
3 + 4
To run the code, make sure the cursor is on the same line as the text. You can place it anywhere on the line as long as nothing is selected. Either of the two following actions will cause Acrobat to run the code.
- Press Ctrl+Enter on Windows, or Command+Enter on Macintosh.
- If your keyboard has a number pad, you can use the Enter key on the number pad without pressing the Control (Command on Mac) key. Macintosh's have the additional issue of keyboard configuration mentioned earlier.
Acrobat displays the result of the execution on the next available line, also shown in Figure 4.
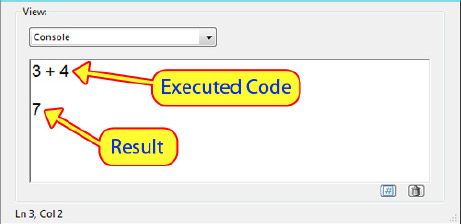
Figure 4 — Simple Calculation in the Console Window
Acrobat always attempts to convert the result of an execution into text so that it can be displayed. Sometimes the result of an operation is not as clean or obvious as a number. Let's try something that doesn't have such a well-defined result. Enter the following line in the Console Window and run it:
3/0
This calculation has an obvious mathematical error, but Acrobat JavaScript doesn't display an error message. Instead, as shown in Figure 5, it displays the word "Infinity." In this case, the result of the mathematical calculation is not quite a number. "Infinity" is a valid value in JavaScript and it can be used in both logical and mathematical expressions, but values like this can cause a script to have a problem if they are not properly handled. It is much easier to find this kind of issue by executing individual lines in the Console Window where you can see the results immediately, than it is to debug it from a field-calculation script.
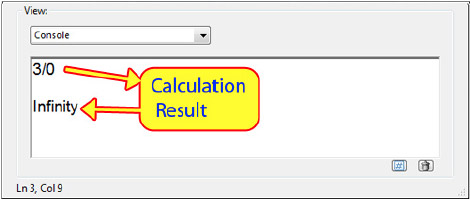
Figure 5 — "Infinity" is a problematic, but valid value.
The next line of example code is something that might be used in a real script. It assigns a simple addition to a variable named 'sum'.
var sum = 5 + 9;
As shown in Figure 6, the return value from this line of code is "undefined." This is not the return value from the calculation. The calculation is executed and applied to the declared variable, sum. However, the first and primary operation on the line is the variable declaration, so this is the operation that returns a value to the Console Window. Unfortunately, variable declarations do not return a value. To overcome this small issue, the Console widow displays "undefined." This is same message displayed for any operation that doesn't return a value, or for variables that have never been declared. Anything that doesn't exist to the JavaScript environment is "undefined."
To display the value of the sum variable, use the cursor to select just the word sum, as shown in Figure 6, then press Ctrl+Enter (Command+Enter on Mac). This action executes just the selected text.
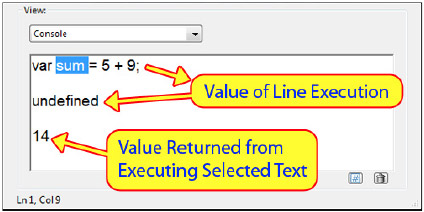
Figure 6 — Variable assignment in the Console Window
This technique of selecting parts of the code for execution is also useful for executing multiple lines of code.
So far we've talked about executing code in the Console Window for testing and debugging, but there is no reason to restrict our usage to this limited theme. The Console Window is an "Immediate Mode Command" window. Immediate Mode means that anything entered into this window is executed directly by the JavaScript engine. We can use it anytime we want to execute code for any purpose.
Two uses for the Console Window (besides code testing) that immediately come to mind are automation and analysis. There are several functions in Acrobat for manipulating and for acquiring information from PDFs and Acrobat. Most of these JavaScript functions have Acrobat menu-item and/or tool button equivalents, but a few don't, so for these operations the Console Window is the only immediate access. For operations with a user interface button or menu item, the main advantage of using JavaScript is greater flexibility, since JavaScript functions typically provide more options than the user interface equivalent. For example, suppose you wanted to know the exact border color of a text field so you could use the same color in another location. Assuming the current document has a field with the correct name on it, the following code displays the raw color value in the Console Window:
this.getField("MyButton").strokeColor;
The result of this operation is a color array. Remember, Acrobat attempts to convert all results into text. Arrays are converted to text by converting each individual array element into a text string, so the result would look something like the following line when it is displayed in the Console Window.
"RGB",255,0,0
This is an example of document analysis with JavaScript. We've just found out something that would have taken us just a little more effort to find out using the Acrobat property dialogs, and the information is in a very usable format. We can easily copy and paste this information to accomplish some other purpose, for example applying the color to another field with this line of code:
this.getField("MyButton2").strokeColor = ["RGB",255,0,0];
The real advantage is that by using JavaScript, we can automate this analysis for the entire PDF. Suppose a document needs to be checked for branding purposes, i.e., all the border colors of all fields in the document should match a special color. The following code uses a simple loop to display this color info in the Console Window for manual inspection:
for(var i=0;i < this.numFields;i++)
{
   var fNm = this.getNthFieldName(i);
   console.println(i+":"+ this.getField(fNm).strokeColor);
}
Because of the loop, this code cannot be executed one line at a time. It has to be done all at once. To execute multiple lines of code, the lines must all be selected before pushing Ctrl+Enter (Command+Enter on Macintosh) to start running it.
Notice that in the loop there is a function called console.println(). It's in the fourth line. This function writes text to the Console Window and it will be discussed in the next section.
Here's an example of a function that does not have an easy equivalent on the regular Acrobat menus and toolbars. Enter the following line into the Console Window and run it:
app.newDoc();
Acrobat will create a new, blank PDF document. This is perfect for trying out new ideas before applying them to a working document.
The results of this operation are shown in Figure 7 below. Note that yet again, the result is something different.
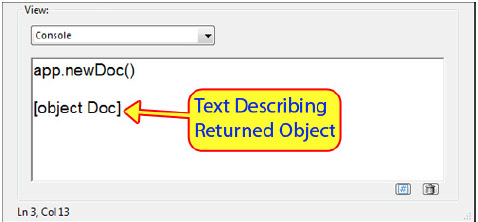
Figure 7 — Object values are complicated, so they display as a text description.
The Console Window has to convert the result of code execution to text before it can be displayed. Not everything has an obviously meaningful text representation. In this case, the output of the function is a Document Object. Objects are converted to text by simply converting their type information to a string.The result shown in Figure 7 tells us the type of object created. This result is only useful in letting us know the function worked. If app.newDoc() had failed, it would have either caused an error (discussed farther on in this article) or returned null. Both of these situations would have been displayed in the Console Window.
Enter and run the following line of code:
this.path
The path property is exactly what you might think it should be. It's the folder path of the current document. Since the current document was just created with app.newDoc() and has not been saved, this path is for the temporary PDF. The result will look something like this:
/C/DOCUME~1/MyName/LOCALS~1/Temp/Acr1FE.tmp
Of course, this information is easily available in the Document Properties dialog. The advantage to using the Console Window is to make this information available to copy to the system clipboard for use with another script in Acrobat or for something else.
Using the Console to display status and error messages
Besides testing code, the Console Window has one other important role in debugging JavaScript. It is the standard location for displaying status and error messages. The Acrobat JavaScript environment has a built-in error handling system. When something goes wrong, this error-handling system usually displays some helpful message (sometimes) in the Console Window, so this is the first place to look when things aren't working. In addition, you can create your own status and error messages to display here.
As an example, let's execute something that will cause an error. Enter and run the following line of code in the Console Window:
app.openDoc("xx.pdf");
This line of code instructs Acrobat to open a file (xx.pdf) that does not exist, an obvious error (if by some chance you actually have a file with this name, please change the code to use something that's not on your system). Acrobat responds by generating an error, which is displayed by the Console Window, shown in Figure 8.

Figure 8 — Acrobat XI error message, generated by a bad file path parameter
The first line of the error message states the file name and/or path is invalid and the last line indicates the script location and the line number of the failing code. This message is critical to understanding why the code failed, especially if the function call is buried in several lines of code inside another script. Always check the Console Window first when something goes wrong.
Note that the second message on the line indicates a security error. For our purposes, this is an erroneous and unhelpful message. There was no real security error, and while it may then seem that Adobe is deliberately trying to either terrify or confuse us, there is a reason the message is being displayed. In fact, the message is not related to the JavaScript engine at all. It is the result of the Acrobat security model, which was made much more robust in versions 9, X, and XI by adding a security layer. This layer blocks operations that don't fit with Acrobat's sense of rightness. JavaScript operations or errors that relate to external resources (on the web or local file system) tend to spook this security layer, which then throws out miscellaneous security errors. If you work with Acrobat JavaScript for any length of time, you'll find all sorts of operations that have nothing to do with security, but nonetheless generate security errors.
We can also create our own messages for display in the Console Window. The Console Window is defined as an object in the Acrobat JavaScript DOM (Document Object Model). This object provides a few functions for manipulating and accessing the Console Window, but for our purposes here the console.println() function is the only one of interest. This function displays a single line of text on the next available line in the Console Window. The following line of code displays the words "Hello Acrobat."
console.println("Hello Acrobat");
The console.println()function is particularly useful for monitoring how code is working. Just place a few console.println() statements at critical locations in your script and you can literally watch the progression of code execution in real time. It is up to the developer to decide what information to display. This information should be relevant to the state of the script.
For example, the following line helps us understand how JavaScript events work in Acrobat. The code can be placed in any script location in a PDF file. Try it out by putting several in different locations in a PDF, a Document script, a Page Action, different JavaScript Field Actions, and so on. It is a good practice to use this code (or something like it) whenever you start a new document scripting project to get a feel for how the different scripts will interact.
console.println("Event Name: " + event.name + " Type: " + event.type);
Watch the Console Window to monitor the sequence of scripts that are executed as you open and close the document, navigate between pages, move the mouse around the document or perform other actions.
Setting up the Console Window in Adobe Reader XI
If you are developing scripts that will be used in Adobe Reader, then it is a good idea to be able to test and debug them in Reader. Adobe added Console Window support to Reader in version 7. However, setting up Reader to actually display the Console Window was very difficult. It required installing special scripts and manually changing Acrobat settings in either the Windows Registry or the Macintosh settings files. It has become much easier in Reader XI. There is only one thing you need to be able to do to use the Console Window, and that is to display it.
Displaying the Console Window in Reader is a bit more difficult than one might think it should. Reader does not have the keyboard shortcut, a menu item, or a tool button for displaying the Debugger Window. This leaves only two options: create your own tool button or menu item or cause a deliberate error.
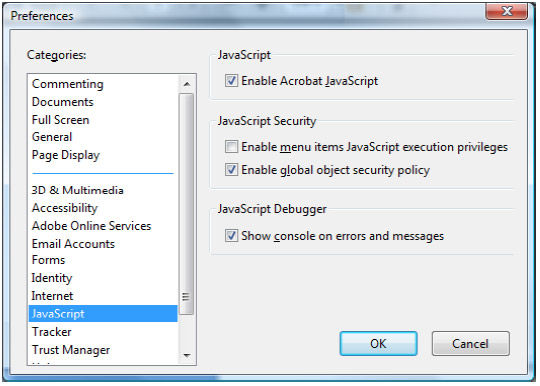
Figure 9 — Error messages are an effective way to display the Console Window
Let's look at the second method first. Both Acrobat and Reader include a Preference for displaying the Console Window on an error message. Figure 9 shows the Reader XI JavaScript Preferences dialog. By default, there is only one option on it relating to the JavaScript Debugger, which is to "Show console on errors or messages." Don't be fooled by this wording. Only an error will automatically display the Console Window. This option is fine for basic debugging, i.e., you have a bug that throws an error and the console is displayed so you can see it, but what do you do if you want to use the Console for running code? Or for viewing messages that aren't errors? One solution is to deliberately throw an error by placing this code in some strategic location, such as a document or button script.throw "Not an Error";
This is how you throw exceptions in JavaScript. But it isn't the best method. A better technique is to create a tool button or menu item that displays the console directly with the "console.show()" function. You can download a script for a tool button here,
http://www.pdfscripting.com/public/Free_Acrobat_Automation_Tools.cfm
And here is a handy script for adding a "Console Window" menu item to the "View" menu in Reader. This script will need to be written into a file with the ".js" extension and then placed in one of the Acrobat JavaScript Folders. It is best to place it in the "User" folder.
app.addMenuItem({cName:"Console Window", cParent:"View", cExec:"console.show()"});
Summary
All in all, the Acrobat JavaScript Console is the greatest thing since, well, Acrobat JavaScript. Use it early and often to test and debug scripts, and to automate processes in Acrobat.
Products covered: |
Acrobat XIAcrobat XAcrobat 9Acrobat Reader |
Related topics: |
JavaScript |
Top Searches: |
Edit PDF create PDF Action Wizard |
Try Acrobat DC
Get started >
Learn how to
edit PDF.
Ask the Community
Post, discuss and be part of the Acrobat community.
Join now >
0 comments
Comments for this tutorial are now closed.
Comments for this tutorial are now closed.